When your garage doors remote control not working properly brings operations to a halt, it's more than an inconvenience—it's a critical issue affecting productivity and security. In this guide, you will learn how to quickly diagnose the problem, from simple battery fixes to complex signal interference, and understand when to call in a professional. We will walk you through practical troubleshooting steps for batteries, signals, reprogramming, safety sensors, and the opener unit itself, empowering you to solve common issues and minimize downtime.
Quickly Diagnose Your Garage Door Remote Problem
A dead commercial garage door remote can bottleneck your loading dock or seal off your warehouse. Before you assume a major system failure, a quick and methodical check-up can often pinpoint a simple issue, saving you from costly downtime. This is your first line of defence.
Start with the remote itself. It's the simplest place to look.
Press the button. Do you see a small indicator light flash? This one action immediately cuts the possibilities in half. No light almost always points to a power issue, like dead batteries. If it does light up but the door doesn't move, you're likely dealing with a signal problem or an issue with the main opener unit.
This flowchart gives you a quick visual path to follow, helping you figure out if you have a battery problem or a signal issue.
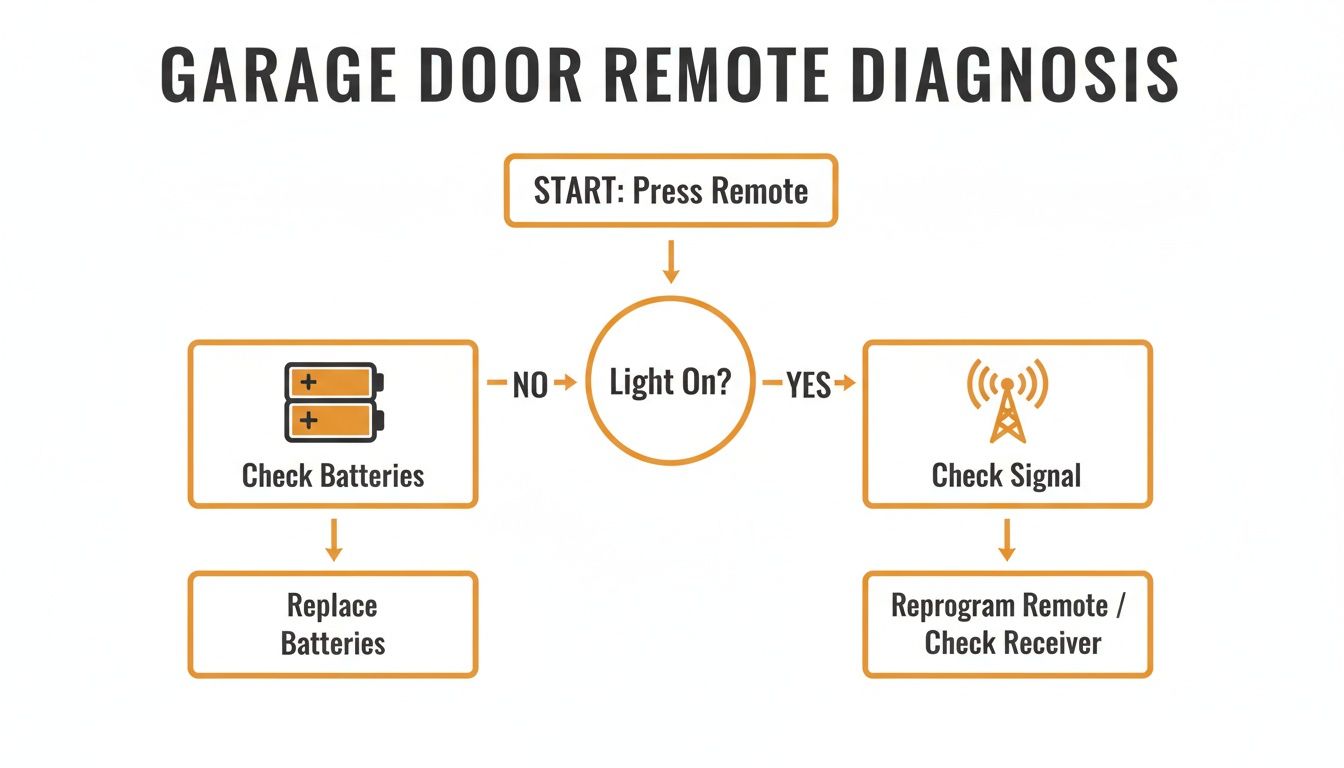
alt="Flowchart diagnosing why a garage door remote is not working, starting with checking the battery indicator light."
The takeaway here is straightforward: if the remote shows any sign of life, the problem isn't its internal power. The breakdown is happening somewhere in the communication between the remote and the opener.
To help you run through these initial checks, we've put together a quick-glance table. Use it to immediately assess your malfunctioning remote and see if it's a simple fix or something that needs a professional eye.
Initial Troubleshooting Checklist For A Non-Working Remote
| Symptom | Potential Cause | Immediate Action To Take | When To Call A Professional |
|---|---|---|---|
| No indicator light on remote | Dead batteries or loose battery contact. | Replace the batteries. Check for corrosion on the metal contacts and clean if necessary. | If new batteries don't solve it, the remote's internal components may have failed. |
| Indicator light works, but door doesn't move | Out of range, signal interference, or opener is in "Lock" mode. | Move closer to the door. Check for new LED lights or electronics nearby. Check the wall control for a "Lock" button. | If none of these actions work, the issue could be with the opener's receiver or wiring. |
| Remote works intermittently or only up close | Weak batteries or signal interference. | Replace the batteries first. If the problem persists, check the antenna on the motor unit. | If range issues continue, you may need a technician to diagnose interference or a failing receiver. |
| Pressing remote makes opener "click" but door won't move | The opener is receiving the signal, but there's a mechanical or electrical issue. | The remote is likely not the problem. Check for physical obstructions or disconnect the opener to try manual operation. | This almost always requires professional diagnosis of the opener motor, springs, or safety sensors. |
This checklist should help you quickly narrow down the root cause. If you've run through these steps and the door still won’t budge, it’s a clear sign that the problem is more complex than a simple remote glitch.
Why Immediate Action Matters
In a commercial setting, a faulty remote is more than a hassle. It’s a direct hit to your bottom line. For example, a single malfunctioning door at a busy distribution center can delay shipments and cause logistical chaos, costing thousands in lost productivity. Getting to know the common culprits helps you restore access fast. The most frequent issues we see are:
- Depleted Batteries: This is the #1 cause of remote failure, hands down. It's especially common in facilities with big temperature swings, like an unheated loading dock in a Canadian winter.
- Signal Interference: New equipment, updated LED lighting, or even a nearby radio tower can jam the signal from your remote.
- Accidental Lockout: Many commercial openers feature a "lock" or "vacation" mode on the wall-mounted control panel that deactivates all remotes. It's surprisingly easy for an employee to hit this by accident.
- Loss of Programming: A power surge, a nearby lightning strike, or sometimes even just changing the battery can cause the remote to lose its sync with the opener motor.
As your "Respected Partners, Reliable Service." provider, we believe in empowering facility managers with the knowledge to handle minor issues on their own. Knowing these first steps can be the difference between a five-minute fix and a half-day of lost work.
By starting with these basics, you can quickly determine if the solution is in your hands or if it's time to call for professional support. In the next sections, we'll dig into each of these potential problems with actionable steps for a solid fix. Of course, for more complex remote or commercial door operator issues, it’s always best to get a certified technician involved. Our Planned Maintenance Programs are also specifically designed to catch and prevent these headaches before they can disrupt your business.
Step 1: Check Batteries and Signal Strength
When your garage door remote stops working, the first impulse is always to blame the batteries. And a lot of the time, you'd be right. But simply swapping them out isn’t the full story, especially in a commercial setting where a dead remote can halt shipments and create a security gap.
Getting it right means looking beyond the battery itself and understanding how power and signal strength work together in a demanding Canadian facility.
Choose The Right Batteries For Commercial Use
At a loading dock that cycles between scorching summer heat and sub-zero winter cold, standard alkaline batteries just don't cut it. They can fail prematurely or seem completely dead in the cold when they're really just underpowered. Extreme cold, especially, can cripple a battery's output.
For this reason, we always recommend using lithium batteries (like the common CR2032 coin cell) in commercial remotes. They perform consistently across a much wider temperature range and provide steady power right until the end of their life. This one small switch can drastically cut down on those "my remote is dead" service calls.
A great proactive step is to schedule battery replacements for all your essential remotes twice a year—once before summer and again before winter. This fits perfectly into a good planned maintenance program and turns a potential crisis into a simple, routine task.
Knowing how to handle different types of remotes is also handy. Many modern commercial remotes are built like car fobs, so understanding how to properly replace a key fob battery without breaking the casing or damaging the electronics gives you a good sense of how to handle them with care.
Find And Fix Signal Interference
If a fresh set of high-quality batteries doesn't do the trick, the signal itself is your next suspect. It’s a common story in busy facilities: a remote works perfectly one day and fails the next because something in the environment has changed.
The hidden culprit is often Radio Frequency Interference (RFI). In simple terms, RFI is "electronic noise." Your remote's signal travels on a specific frequency, and other electronic devices can essentially "shout" over it, jamming the signal before it ever reaches the door opener.
Common sources of RFI we see in commercial buildings include:
- New LED Lighting: Many modern, energy-efficient LED light bulbs are notorious for emitting RFI that interferes with garage door remote signals. If your remote problems started right after a lighting upgrade, this is a strong possibility.
- Wi-Fi and Security Systems: A newly installed mesh Wi-Fi network, security camera system, or another wireless device near the operator can compete on similar frequencies.
- Heavy Machinery: Sometimes, the electrical motors in large equipment like conveyors or trash compactors can generate enough electronic "noise" to block a remote's signal while they're running.
Field Tricks For Fixing Signal Problems
Before you pick up the phone for a service call, there are a couple of practical tests you can run yourself.
First, try the remote from different distances and angles. Does it only work when you're standing directly underneath the opener? That points to a weak signal, which could be a dying remote, a blocked receiver, or interference.
Next, take a look at the operator's antenna. It’s usually just a small wire hanging down from the motor unit.
- Is it damaged or bundled up? The antenna needs to hang straight down. Make sure it isn't tangled, coiled, or touching any metal, which can ground out the signal.
- Can you move it? Sometimes just repositioning the antenna a few inches away from a metal bracket or electrical conduit makes a world of difference. A simple trick we use is to feed the wire through a plastic drinking straw to keep it straight and isolated.
If you’ve tried these steps and the remote still won’t cooperate, the issue is likely more complex—perhaps with the opener’s internal receiver board. When you’ve gone through these diagnostics for your commercial door operator and are still stuck, it's a clear signal to call in a professional. Our technicians have the tools to pinpoint the exact source of RFI and implement a reliable, long-term fix.
Step 2: Reprogram the Remote (The Right Way)
So you’ve swapped the batteries and checked the signal, but your garage door remote is still dead in the water. Reprogramming feels like the next logical move, and often, it is. But jumping the gun here can turn a small annoyance into a massive operational headache.
We’ve seen it happen: a well-intentioned fix accidentally wipes every single remote from the opener's memory, causing a facility-wide lockout. Let's walk through how to do this the right way, so you can get your door working again without creating a bigger problem.
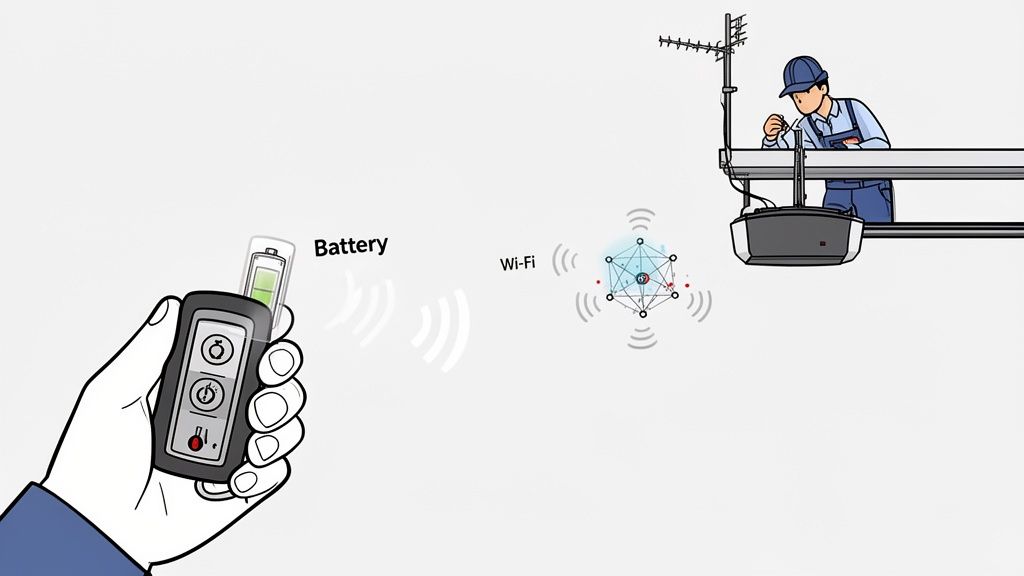
alt="A hand holding a garage door remote control, showing how a signal is sent to the door opener."
Remotes don't usually lose their programming for no reason. Figuring out why it happened can point you toward a simple fix or reveal a more serious issue with the opener itself.
Common Reasons A Remote Needs Reprogramming
Before you grab a ladder and start pressing buttons, think about what might have caused the disconnect.
- Power Surges: A nearby lightning strike or a major power fluctuation can scramble the memory on the opener’s logic board, making it "forget" the remotes it was paired with.
- Battery Replacement: It sounds simple, but on some older or more sensitive models, the act of swapping the battery is enough to clear the remote's code.
- Rolling Code Sync Issues: Modern commercial openers use rolling code technology for security. Each time you press the button, the remote and opener sync up with a new code. If you press the remote button too many times while out of range (maybe it was getting knocked around in a toolbox), it can fall out of sync.
- Adding or Removing Other Remotes: When programming new remotes for staff or vehicles, it's easy to accidentally hit a command that wipes all existing codes from the system.
If the remote just stopped working out of the blue, a quick reprogramming is a perfectly good troubleshooting step. But if you find yourself doing this repeatedly, it’s a strong sign that the logic board in the opener is starting to fail and needs a professional look.
Safely Reprogramming Your Commercial Remote
The whole process centres on the "Learn" button (sometimes labelled "Learn Code" or "Program") on your commercial door operator. This is the small button on the motor unit, usually near the antenna wire, that puts the opener into pairing mode. Depending on the brand, it might be purple, red, orange, or green.
CRITICAL TIP: You absolutely must know the difference between a short press and a long press of that "Learn" button. A quick press puts the opener in pairing mode for about 30 seconds. Holding the button for more than 6-10 seconds will almost always erase the memory of ALL programmed remotes. This is the number one mistake we see, and it can shut down access for your entire team.
To safely add a single remote back into the system:
First, find the "Learn" button on the opener motor—you'll probably need a ladder.
Next, press and immediately release the "Learn" button. Don't hold it down! A small indicator LED next to it should light up and stay on.
You now have about 30 seconds to act. Press and hold the button on your remote control that you want to use.
Keep an eye on the opener unit for confirmation. The main lights will usually flash once, or you'll hear a distinct "click." The small LED by the "Learn" button might also turn off. Once that happens, release the remote button.
Now, give it a test. The door should operate as normal. This process reconnects your remote without touching any others. If a power surge knocked out multiple remotes, you'll just need to repeat these steps for each one.
When Reprogramming Isn't Enough
Let’s say you successfully reprogram the remote, but a few days or weeks later, it stops working again. This is a classic symptom of a failing receiver or logic board inside the opener. At this point, reprogramming is just a temporary fix for a much deeper problem.
For persistent issues like this, or if you're trying to manage a large number of access devices across a busy facility, it's time to call in a professional. Our technicians can quickly diagnose the root cause and get it fixed properly, preventing any more disruptions. A Planned Maintenance Program ensures your entire door system is inspected regularly, allowing us to catch and fix these kinds of problems before they ever start.
Step 3: Inspect Safety Sensors and Wiring
If your remote opens the door just fine but stubbornly refuses to close it, you’ve just stumbled upon a massive clue. The problem almost certainly isn't your remote. This classic symptom points directly to a fault in your door’s most critical safety system: the safety sensors or their wiring.
These sensors, often called photo-eyes, are a non-negotiable safety feature. They project an invisible infrared beam across the door opening. If anything—a person, a pallet, or a piece of equipment—interrupts that beam while the door is closing, the system instantly reverses course to prevent injury or damage. When this system fails, the opener defaults to a safe mode: it will let you open the door, but it won't risk closing it remotely.
The Telltale Signs of a Sensor Problem
Time to think like a technician. Your first stop shouldn't be the remote, but the two small sensor units mounted near the floor on either side of the door track. Each sensor has a tiny LED indicator light, and these lights are your best diagnostic tool.
- Solid Lights: If both the sending and receiving sensors show a solid, steady light (usually green or amber), they are aligned and communicating correctly. The problem is likely elsewhere.
- One Light Off or Blinking: If one of the lights is out or blinking, you've found your culprit. This means the sensors are either misaligned, blocked, or have a wiring issue.
A blinking sensor light is the most common sign of trouble. It’s the door's way of telling you, "I can't see the other sensor, so I won't close." Recognizing this signal is the first step to a quick fix.
This issue is incredibly common in active commercial environments. For example, in a busy loading dock, vibrations from heavy trucks can easily knock a sensor out of alignment. Failing to maintain proper alignment doesn't just cause inconvenience; it significantly increases operational hazards.
How to Diagnose and Fix Sensor Faults
Before you call for service, a few simple checks can often get your door moving again. These steps tackle the most frequent causes of sensor failure we see in the field.
Clean the Lenses
The sensor lenses can easily get covered by dust, dirt kicked up by forklifts, or even a small cobweb. Simply take a soft, clean cloth and wipe both lenses. More often than not, this is all it takes to restore the connection.
Check for Obstructions
Take a quick look and make sure nothing is breaking the beam's path. We've seen it all—a pallet, a stray piece of shrink wrap, or a broom leaning against the wall can be just enough to trigger the safety mechanism. Make sure the path between the two sensors is completely clear.
Perform a Basic Alignment Test
If cleaning and clearing didn’t do the trick, the sensors are probably misaligned.
- Gently try to move one sensor by hand, wiggling it slightly up, down, left, and right.
- Have a coworker watch the LED on the receiving unit as you adjust the other.
- When you see the blinking light turn solid, you’ve found the sweet spot. Carefully tighten the sensor’s mounting bracket to lock it into place.
Inspecting The Wiring For Damage
The low-voltage wiring that connects the sensors to the opener is another common point of failure. In a busy warehouse or loading dock, these thin wires are vulnerable to being snagged by equipment, crushed under a pallet, or even cut.
Do a quick visual inspection. Trace the wire from each sensor all the way back toward the opener unit. Look for any obvious signs of damage—pinches, frayed sections, or clean breaks. A damaged wire will interrupt the signal just like a misaligned sensor will. If you spot a clear break and are comfortable with basic electrical work, a simple splice might get you running again. However, for recurring issues or extensive damage, a professional repair is always safer and more reliable.
If these steps haven't solved the problem, it might be time to dig a little deeper. Our comprehensive guide on garage door sensors offers more advanced troubleshooting tips. When you've confirmed the sensors are the root cause but can't resolve it yourself, calling a professional is your next best step.
Step 4: When to Suspect the Opener Itself
So, you've done all the groundwork. You’ve put fresh batteries in the remote, checked for signal issues, and even gone through the reprogramming steps. You’ve wiped down the safety sensors and made sure their lights are solid. And yet, your commercial door is still stuck.
When you’ve crossed off all the usual suspects, it’s time to look past the accessories and inspect the heart of the system—the garage door opener itself. This is often the point where a simple fix turns into a more complex mechanical or electrical problem.
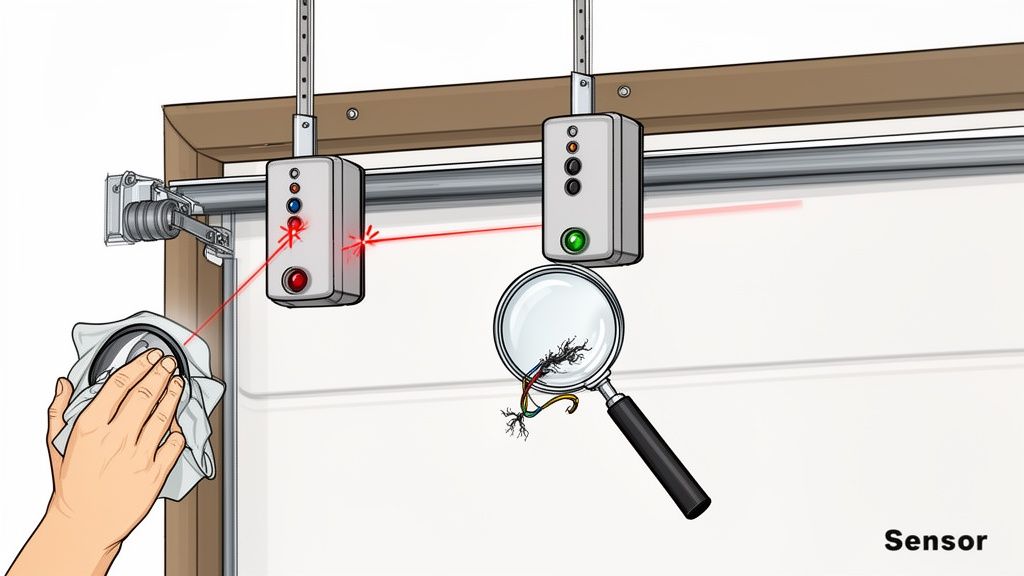
alt="Inspecting garage door sensors and wiring for damage that would cause the remote to not work."
What To Listen For
Your ears are one of your best diagnostic tools here. Head over to the wall-mounted control panel—the one that's hard-wired to the motor—and press the button. Pay close attention to the sounds coming from the opener unit.
- A Loud Humming or Buzzing: If you hear the motor hum loudly but the door goes nowhere, that's a classic sign of a failed motor capacitor. The capacitor is a small component that gives the motor the initial electrical "kick" it needs to lift a heavy door.
- Grinding or Stripping Noises: A nasty grinding sound usually points to stripped gears in the opener’s drivetrain. This is a common result of wear and tear, especially on older units or doors operating under excessive strain without regular maintenance.
- Clicking, But No Action: Do you hear a sharp "click" from the opener after pressing the button? That's a good sign, in a way. It means the logic board is getting the signal and trying to start the motor. If nothing happens after that click, the problem likely lies with the motor itself or the capacitor we mentioned.
- Complete Silence: No click, no hum, no anything? If the opener is completely dead even when using the wall button, the unit probably isn't getting any power.
From Tripped Breakers To Faulty Logic Boards
If you’re met with total silence from the opener, your first stop should be your facility’s circuit breaker panel. A high-cycle commercial door can occasionally trip a breaker, and a simple reset might be all you need.
However, if the breaker trips again right away, you're looking at a bigger issue, like a short in the motor or its wiring. That’s a job for a professional technician.
If the breaker is fine, the problem could be the opener’s internal logic board. This is the electronic brain of your system, handling everything from remote signals to safety features. A power surge, moisture, or just old age can fry a logic board, turning your opener into a very heavy paperweight.
Understanding the difference between a simple power issue and an internal component failure is key. A tripped breaker is a quick reset; a faulty logic board is a clear signal that the problem has moved beyond a DIY fix and needs expert hands.
Problems like a faulty motor or a dead logic board aren't something you can typically fix yourself. For complex mechanical or electrical diagnostics, especially for specific models like those covered in our guide to belt drive garage door openers, you need professional expertise.
Knowing these advanced symptoms is empowering. When you call for service, you can give our team a detailed report—"The motor is humming, but the door isn't moving"—which helps our technicians show up with the right parts to diagnose the problem faster. As your “Respected Partners, Reliable Service” providers, we appreciate that kind of teamwork.
If you suspect your opener has a serious mechanical or electrical fault, it's time to call in the professionals. Contact Wilcox Door Service today to schedule a service inspection and let our certified technicians get your operations back on track safely.
Proactive Maintenance For Long-Term Reliability
The best fix for a garage doors remote control not working is to make sure it never happens in the first place. While knowing how to troubleshoot is useful, a proactive approach to maintenance is what truly separates a smooth-running facility from one plagued by constant, unexpected breakdowns. It's about shifting from reactive repairs to long-term reliability.
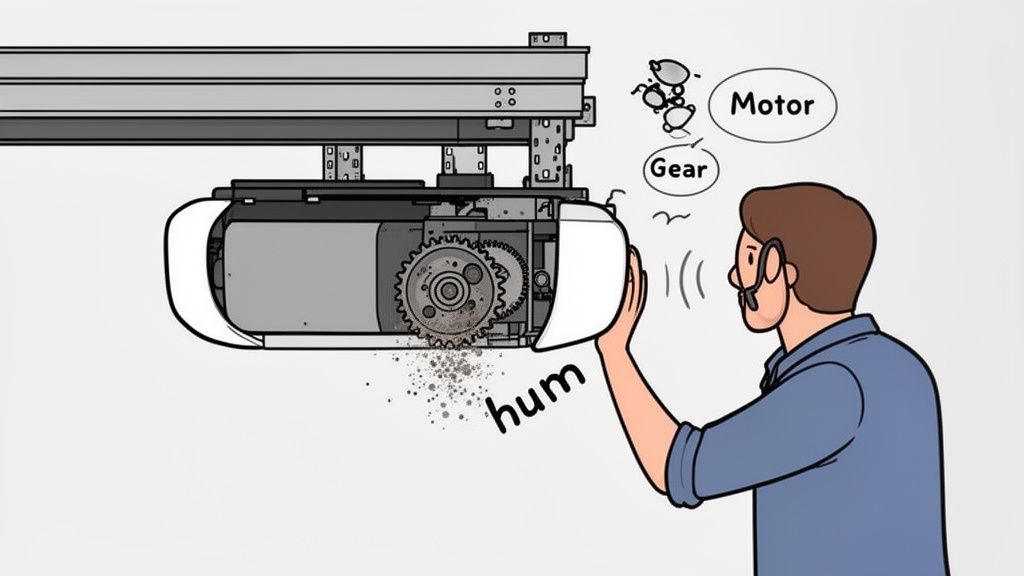
alt="A technician inspects a garage door opener motor as part of a proactive maintenance plan to prevent remote control issues."
Think of it this way: you wouldn't wait for a delivery truck’s engine to fail before changing the oil. The same logic applies to your facility's access points. A scheduled maintenance plan is far more than just lubricating a few parts; it's a comprehensive health check for your entire door system.
Catching Problems Before They Start
A professional maintenance inspection is designed to spot the subtle signs of a coming failure—issues that often go unnoticed until they cause a complete shutdown. During a routine check, a certified technician can get ahead of the very problems we've been discussing.
- Battery Degradation: A technician can test the power output of all your critical remotes and replace batteries before they fail. This simple step prevents those frustrating "dead remote" moments, especially before a harsh Canadian winter sets in.
- Signal Interference Creep: As your facility grows with new equipment or upgraded lighting, subtle radio frequency interference (RFI) can build up over time. A technician with the right diagnostic tools can detect this creeping interference and adjust an antenna or recommend shielded parts before your remotes become unreliable.
- Sensor Misalignment: The constant vibrations from heavy machinery or forklifts can slowly knock your safety sensors out of alignment. Regular checks ensure they are perfectly positioned, preventing those times when a door gets stuck open and refuses to close.
As your "Respected Partners, Reliable Service." provider, we believe that an hour of planned maintenance is worth a day of avoided downtime. It's the most effective way to ensure operational continuity and protect your investment.
The Value Of A Professional Partnership
For any busy facility manager, partnering with experts for maintenance provides tremendous value. It’s about more than just repairs; it ensures safety compliance, extends the lifespan of your expensive door and opener assets, and delivers priceless peace of mind.
Instead of scrambling when a garage door remote suddenly stops working, you have a system you can actually depend on. A well-structured program also helps with budgeting by turning unpredictable repair bills into predictable operational expenses. Our experts can help build a schedule that’s tailored specifically to your facility’s usage and needs. For a real-world example, a high-volume warehouse might need quarterly inspections, while a smaller facility may only require biannual checks.
Ultimately, proactive maintenance is the cornerstone of a smooth-running facility. When you’re ready to move from fixing problems to preventing them entirely, our team is here to help.
Ready to ensure the long-term reliability of your facility's access points? Contact Wilcox Door Service today to discuss a Planned Maintenance Program tailored to your needs.
Frequently Asked Questions
When your commercial garage door remotes act up, you need answers fast. Here are our expert responses to some of the most common questions we hear from facility managers dealing with a garage doors remote control not working.
How Can I Tell If The Remote Is Broken Or If It's The Opener's Receiver?
This is a classic head-scratcher, but there's a simple test. Walk over to your wall-mounted control panel.
If the door operates perfectly with the hard-wired button but won't budge with any of your remotes (even after checking batteries), the problem is almost certainly with the remote's signal or the opener's receiver.
Now, if you have a second remote that you know works and it also fails to operate the door, the issue likely points to the opener's internal receiver or logic board. At this stage, your best bet is to call a technician. Trying to diagnose the main unit yourself could lead to more significant damage.
Can I Use A Universal Remote For My Commercial Garage Door?
We get this question a lot, and our advice is always the same: we strongly advise against using universal remotes for commercial properties. It might seem like a quick fix, but the risks aren't worth it.
Commercial operators rely on specific frequencies and critical security features like rolling codes to protect your facility from unauthorized access. A generic, off-the-shelf remote often bypasses these crucial security protocols, leaving your property and assets vulnerable.
Furthermore, universal remotes can cause significant signal conflicts in a busy industrial environment, leading to unreliable performance. Always use the manufacturer-specified remote to ensure both security and operational dependability.
How Often Should My Commercial Remotes And Operators Be Serviced?
For most commercial applications, we recommend a professional maintenance check at least once a year. Think of it as an annual tune-up to keep things running smoothly.
However, for high-cycle environments like distribution centres or busy manufacturing plants, biannual service is a much safer bet. A planned maintenance program is designed to catch small issues with remotes, sensors, and operators before they can escalate into major downtime.
If you’ve run through the troubleshooting steps in this guide and your remote still isn’t cooperating, or if you suspect a more complex problem, it may be time for professional garage door repair and service.
When you need a reliable solution for your commercial doors and loading docks, Wilcox Door Service Inc. is your trusted partner. Contact us today for a service inspection or to learn more about our comprehensive maintenance programs.