


A reliable roll up door installation instructions PDF should give you exact field tolerances, not vague diagrams. On a commercial install, that means checking guides at 3–4 mm of working clearance, cycling the door five times at final test, and treating spring setup as a trained-tech task with benchmarks like the 4 o'clock bottom rail position and two full turns on the axle where the manufacturer calls for it.
If you're looking for a dependable PDF to use on site, download the manufacturer instructions before anyone unloads the coil or sets a guide. That document belongs in the lift, on the cart, and in the project file. In commercial work, the paper matters almost as much as the hardware because the install has to be safe, repeatable, and support inspection when the opening is part of an active warehouse, loading dock, or conditioned envelope.
Meta description: Roll up door installation instructions PDF guide with commercial install steps, safety checks, spring tensioning, and commissioning advice.
Your Professional Guide to Commercial Door Installation
A commercial rolling door doesn't forgive sloppy work. If the opening is out, the guides are off, or the balance is wrong, the problems show up fast as binding, latch trouble, rough travel, and avoidable downtime.
Facility managers usually start with the same need. They want a roll up door installation instructions PDF that crews can trust on site, plus a practical explanation in plain language. That's the right approach. The PDF gives the manufacturer sequence, and the field guide fills in the judgement calls that separate a clean install from a callback.
For teams comparing references, this broader guide for facility solution installation is useful for organising site documents and install procedures across equipment types. If you're sourcing or replacing a commercial coiling assembly, Wilcox also has product context for a roll-up steel door so the door type, operating method, and opening conditions match the application.
What matters on a real job
In the field, commercial door installation comes down to a few essential requirements:
- Opening accuracy first: If the jambs aren't plumb or the floor isn't level, the rest of the install becomes compensation work.
- Guide alignment second: The curtain can only travel as well as the guides allow.
- Controlled handling of the coil: A roll-up curtain stores weight and spring energy. Losing control during staging is how people get hurt.
- Proper spring balance: A balanced door should operate predictably and hold where it's supposed to hold.
- Commissioning with documentation: The install isn't done when the fasteners are tight. It's done when the door runs correctly and the paperwork supports turnover.
Commercial rolling doors are simple only from a distance. Up close, they're precision assemblies mounted on imperfect buildings.
That's the mindset to keep. A senior installer doesn't rush the early checks because fixing bad prep at the end takes longer, costs more, and rarely looks clean.
Pre-Installation Prep and Essential Safety Checks
Most installation failures start before the first anchor goes in. The opening wasn't checked, the wall condition wasn't confirmed, or the crew tried to make the door fit the building instead of making sure the building could accept the door.
Site conditions that must be verified
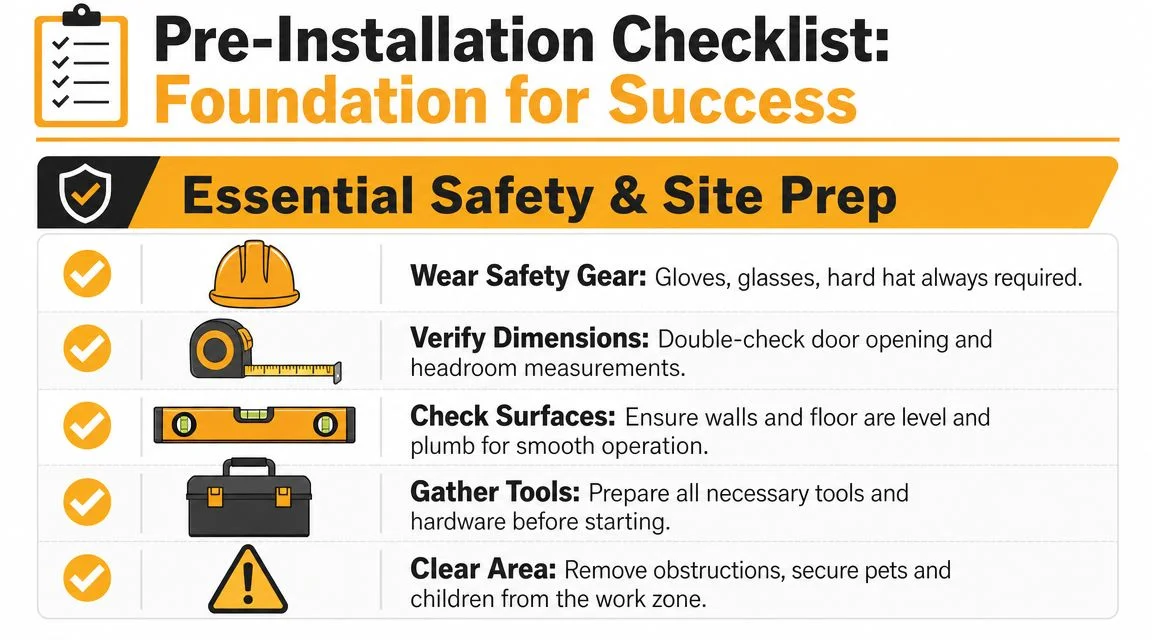
The installation workflow starts by checking the wall opening, jamb plumb, and floor and header level, and one installer manual also calls for clearing the installation area plus 2 metres in front of the opening before work begins, because skipped pre-checks lead to binding, poor latch alignment, and impossible spring balance later in the job, as shown in this installer specification for light-duty roll-up doors.
Use this pre-flight list before the door comes off the pallet:
- Confirm opening condition: Check that the jamb faces are sound, flush enough for mounting, and free of damage that will telegraph into the guides.
- Check plumb and level: A guide mounted to an out-of-plumb jamb will force the curtain to rub, wear, or telescope sideways.
- Verify side and head room: The coil, brackets, and operating gear need clear space. If conduit, sprinkler pipe, or framing intrudes, stop and resolve it before staging.
- Clear the work zone: Keep the area in front of the opening open for material handling, ladders, and safe rotation of the coil into place.
- Stage hardware by side: Left and right components need to stay organised. Mixed fasteners and flipped guides waste time and create avoidable errors.
Practical rule: If the opening is questionable, measure again before you touch the packaging.
Required tools and materials checklist
| Category | Items |
|---|---|
| Measuring and layout | Tape measure, level, plumb reference, marker, layout notes, manufacturer PDF |
| Access and lifting | Ladders, suitable lift or access equipment, material supports, controlled staging area |
| Hand tools | Spanners, sockets, ratchet, screwdrivers, locking pliers, hex keys where required |
| Anchoring and fastening | Drill, bits matched to substrate, anchors specified for the wall condition, washers, nuts, manufacturer-supplied hardware |
| Safety equipment | Gloves, eye protection, hard hat, barricades, lockout method for operator circuits if present |
| Commissioning items | Lubrication if specified by manufacturer, test sheet, torque tool if required, controls check list |
Safety that can't be improvised
The dangerous parts of a rolling door install are predictable. The coil is heavy. The curtain wants to move when released. The spring system stores energy. None of that should be treated casually because the door is “just manual.”
The field sequence for light-duty units often calls for staging the left and right guides on the floor, setting the coil between them, then rotating and feeding the bottom bar into the guides while maintaining control. The critical warning is to cut shipping wrap only while firmly holding the bottom bar and keeping the curtain secured through guide attachment. If that sounds overly careful, it isn't. That's basic control of a loaded assembly.
Never release wrapping, strapping, or retaining methods until the door is physically controlled and the crew understands what will move next.
Code and documentation before the install
In regulated projects, code review belongs at the start, not at turnover. A facility manager should know whether the door is part of the building envelope, whether the opening serves conditioned space, and whether the project record needs the installation document kept with closeout materials.
That point gets overlooked on retrofit work. It shouldn't. A missing PDF or missing installation detail can become an administrative problem long after the mechanics are done.
The Core Installation Process Explained
Once the opening checks out, the critical step involves alignment and control. An experienced crew proves its worth in these aspects. A rolling door can be physically installed in short order, but a door that runs smoothly, seals properly, and doesn't chew its own curtain demands precision.
Setting the guides correctly
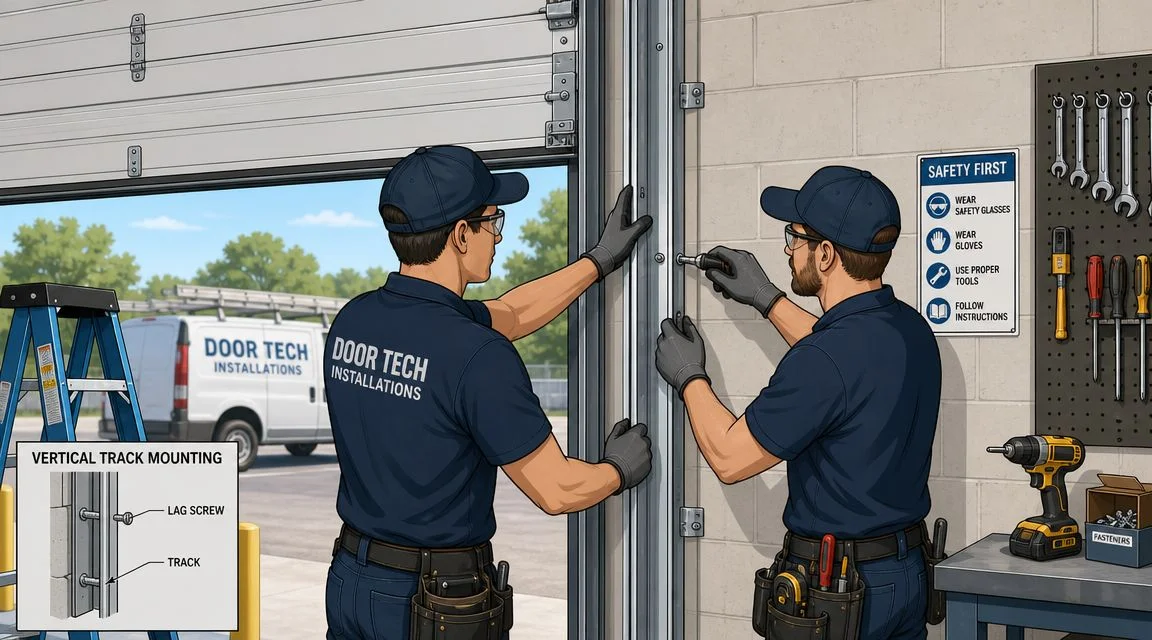
Start by positioning both guides so they're plumb and centred about the opening. In at least one installer specification, guide spacing is set to curtain width plus 1 inch. That dimension matters because too narrow will pinch the curtain and too wide will let it wander.
Once the guides are up, the working clearance becomes the critical test. Professional manuals specify only 3–4 mm of guide clearance, and final verification includes opening and closing the door five times to confirm smooth travel, as outlined in this roll-up door installation manual with tolerance and test benchmarks.
What works on site is simple:
- Plumb both guides independently: Don't assume the wall gives you a straight line.
- Check parallel condition: A pair of plumb guides can still be wrong if they aren't parallel to one another.
- Measure top and bottom: A tape tells you quickly whether the opening is squeezing or spreading.
- Set clearance deliberately: If you eyeball 3–4 mm, you'll usually miss it.
A curtain that scrapes in the guides rarely “wears in.” It usually gets worse.
Staging the coil and feeding the curtain
With the guides prepared, the coil gets set between them and rotated into installation position. This part takes control and communication. One technician handles the weight and orientation, the other watches alignment and keeps the curtain from catching an edge.
Feed the bottom bar into the guides smoothly. Don't force it. If it doesn't want to enter cleanly, something is off in guide spacing, guide flare, or coil orientation. Forcing the first travel is a common way to mark slats and start a job with a damaged curtain.
Fastening and keeping the assembly true
As the brackets and barrel are secured, keep checking that the system hasn't walked out of square. Buildings aren't perfect. Masonry can vary. Steel can pull. Anchors can shift a guide slightly when tightened.
Crews get into trouble by tightening everything fully before they verify the running path. A better method is to snug major points, confirm alignment, then lock the system down in sequence.
A rolling door should be guided into true. It should never be dragged into true by the curtain.
What a clean mechanical install looks like
Before any tension adjustment, the assembly should show a few obvious signs of quality:
- The guides sit cleanly on the mounting surface
- The curtain enters both guides without rubbing
- The bottom bar stays square to the opening
- Latches line up without being forced
- The coil turns without visible side pull
If one of those looks wrong, stop there. Spring adjustment won't cure a bad mechanical install. It only hides it for a little while and makes diagnosis harder later.
Mastering Spring Tension and Door Balancing
Spring tension is where commercial rolling door work stops being general carpentry and becomes specialised door work. The hardware is designed to counterbalance door weight. In plain terms, the spring stores lifting force so the steel curtain doesn't feel as heavy as it is.
The benchmark setup technicians recognise
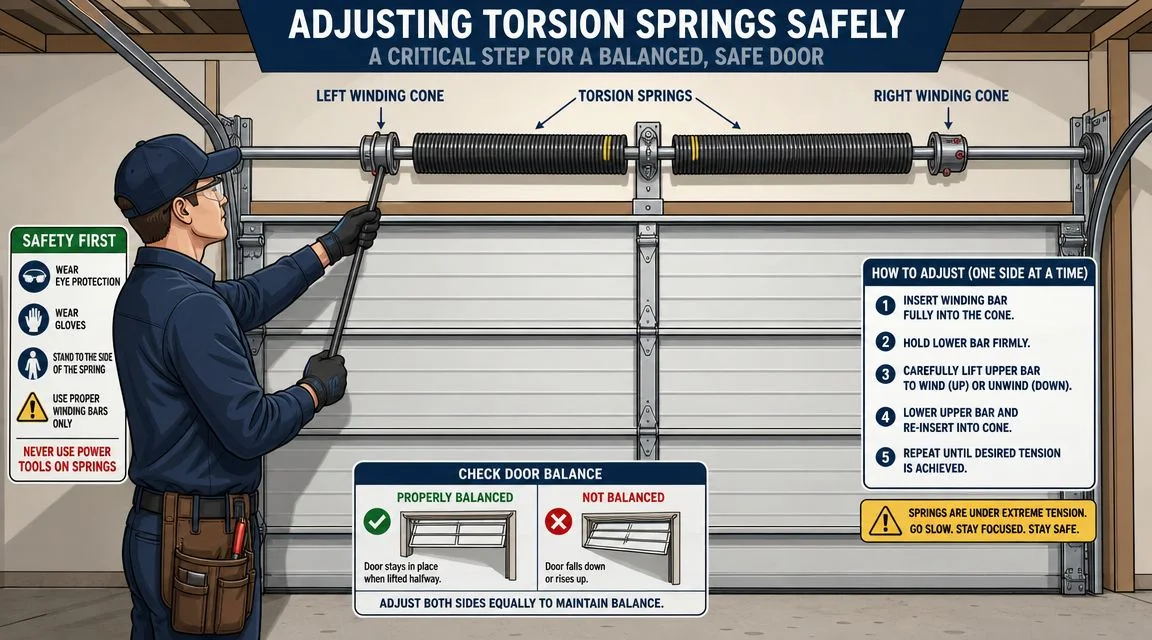
For many roll-up doors, the setup sequence includes placing the bottom rail at about the 4 o'clock position, applying two full turns on the axle, and tightening U-bolts to a minimum of 20 ft-lbs. The acceptance standard is practical and unforgiving. A properly balanced door should stop and hold in any position when cycled. If it's heavy, meaning hard to open, it needs more tension, as detailed in this rolling door installation guide covering balance and hardware torque.
The wording matters. “Heavy” is not a casual impression. It's a diagnostic condition. If the door wants to drop, fight you on the way up, or refuses to hold, the counterbalance isn't right.
For readers dealing with older assemblies, replacement spring work and related service conditions are covered on Wilcox's page about garage door installation spring.
Why trained technicians handle this stage
Manuals consistently separate mounting from spring adjustment because the risks aren't equal. Mounting is structural and mechanical. Tensioning adds stored energy. That's why trained rolling-door technicians handle this part on serious commercial work.
A few practical points matter here:
- Use controlled positioning: The bottom rail location gives you a repeatable starting point.
- Track reference marks: Horizontal reference lines help confirm that the axle is rotating as intended.
- Retighten before cycling: Hardware has to be secured before packaging is removed and balance is tested.
- Cycle and judge behaviour: The door should move evenly and hold where placed.
If the door is easy to close but hard to open, don't call it “a little stiff.” Call it what it is. Under-tensioned and not ready for handover.
The video below shows the kind of controlled technique and body positioning professionals use during spring-related work.
What doesn't work
What fails most often is overconfidence. People rush the tensioning, skip reference checks, or try to tune balance around a door that's mechanically misaligned.
That creates a bad loop. The installer adds or removes tension to mask friction, the curtain still runs poorly, and the door ends up unsafe and unreliable. Good technicians don't use spring force to compensate for crooked guides or bad mounting surfaces.
Final Commissioning and Operational Checklist
A commercial rolling door isn't ready because it opens once. It's ready when the opening, the curtain travel, the latch or operator, and the documented install condition all line up. Commissioning is quality assurance, not ceremony.
In some jurisdictions, the installation document also has compliance value. In California, Title 24 energy standards can make a roll-up door's installation instructions a supporting document for code compliance, especially when the assembly affects the building envelope, as described in this reference on installation guides and energy-code relevance.
Commissioning checks that matter
Use a formal handover checklist. It keeps everyone honest and gives the facility manager something useful after the crew leaves.
- Travel test: Run the door through full travel and confirm smooth movement without scraping, hesitation, or visible side drift.
- Hold test: Place the door at intermediate positions and confirm it behaves predictably. A door that won't hold points back to balance problems.
- Seal contact: Check weathering and edge contact across the opening. Gaps usually trace back to opening condition or alignment errors.
- Latch and locking check: Make sure the lock side engages without forcing the bottom bar or pulling the curtain sideways.
- Control visibility: Where controls are part of the install, they should be located so the opening is clearly visible during operation.
- Fastener review: Inspect all accessible hardware for completeness and security before turnover.
- Document retention: Keep the installation instructions, test notes, and any project-specific approval records with the facility file.
What passing looks like
A passing door feels boring in the best possible way. It moves smoothly, stops where expected, and doesn't demand explanation. The bottom bar meets the floor correctly. The guides don't chatter. The user doesn't have to develop a “knack” to operate it.
The best commissioning result is a door the staff can use without learning its quirks.
A failed check usually points back to one of three roots. The opening was never suitable, the mechanical alignment drifted during install, or the balance was adjusted to compensate for another fault. Commissioning is where those shortcuts show themselves.
Troubleshooting and Long-Term Maintenance
Most post-install issues aren't mysterious. They're signs. A rough-running door, a lock that doesn't line up, or a curtain that starts to drift tells you something changed or was never set correctly in the first place. The smart move is to correct the cause early, before the opening becomes unreliable during shipping hours or shift changes.
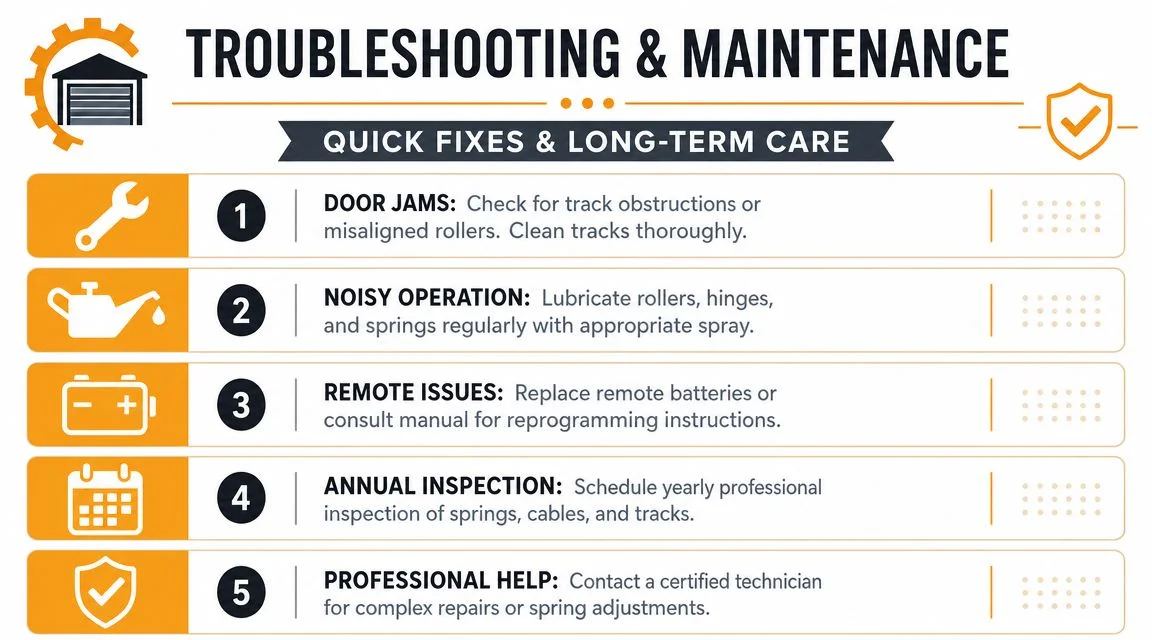
Quick fixes for common field problems
- Door runs rough in the guides: Check for debris, guide damage, or guide spacing that has moved out of tolerance. If the curtain shows fresh rub marks, treat it as an alignment issue first.
- Curtain tracks sideways: Look at guide plumb, barrel position, and whether the assembly stayed centred on the opening during fastening.
- Bottom bar won't latch cleanly: Recheck squareness, guide position, and whether the floor condition is affecting final seating.
- Door feels inconsistent by hand: Don't guess. Mechanical drag and spring balance can feel similar to an untrained operator.
- Operator or control use feels awkward: Confirm the user can see the opening clearly during operation and that commissioning didn't leave unresolved travel issues.
The maintenance habit that protects the install
A newly installed rolling door should go straight into a maintenance routine. That doesn't need to be complicated, but it does need to be consistent.
Facility staff can usually handle visual housekeeping tasks such as keeping the guides clear, watching for unusual wear marks, and reporting changes in sound or travel. Certified technicians should handle spring work, major alignment correction, hardware replacement, and any condition involving stored energy or structural anchorage.
A practical maintenance culture looks like this:
- Keep the guides clean: Dirt, packaging scraps, and dock debris turn into friction fast.
- Watch the curtain edges: Fresh wear marks are early warning signs.
- Listen during operation: Grinding, scraping, or sudden changes in sound deserve inspection.
- Check the opening after impact: Forklift contact, pallet strikes, and dock traffic can shift mounting surfaces without making the damage obvious.
- Use a documented service plan: A written programme catches change over time better than memory does.
For facility teams building that routine, Wilcox has a practical article on maintaining a rolling steel door that helps separate basic housekeeping from technician-level service.
The reason to stay ahead of maintenance isn't abstract. Commercial doors sit in the middle of real operations. When they fail, trucks wait, staff improvise, and security or environmental control suffers. Preventive service is cheaper than reactive disruption, even before you factor in safety exposure.
If your team needs help reviewing a manufacturer PDF, commissioning a new rolling door, or correcting an installation issue before it becomes downtime, contact Wilcox Door Service Inc.. Respected Partners, Reliable Service.
Frequently Asked Questions
What tolerances matter most in a roll-up door installation?
Field tolerances of 3–4mm working clearance are critical, along with correct guide alignment and spring tensioning — deviations here lead to binding, latch trouble, and premature wear.
Should roll-up door spring setup be done by a trained technician?
Yes — spring tensioning is a trained-technician task with specific benchmarks like bottom rail position and axle turns; incorrect tensioning is a common cause of door failure and safety risk.
How many test cycles should a new roll-up door installation go through?
Best practice is to cycle the door a minimum of five times at final test to confirm smooth travel, proper latching, and correct balance before handover.
Where should the manufacturer’s installation PDF be kept on site?
The manufacturer’s installation document should be kept with the lift equipment, the install cart, and the project file — it supports both the install and future inspection requirements.